

Growing turnips in your garden can be easy and fun with the right tips. In this article, we will show you 10 easy steps to help you grow turnips from seed!
This guide will help beginners with how and when you should plant, water, thin out, harvest and store turnip plants that have been grown from seed.
First, let’s start by talking about what a turnip is.
The easy-to-grow and healthy turnip
A turnip (Brassica rapa) is a root vegetable that grows in temperate climates mostly in North America and Europe. They are typically grown for their edible white fleshy roots which range from golf ball size to tennis ball size.
Turnips are fantastic additions to your vegetable garden. Turnips are easy to grow from seed and don’t take up a lot of space. They also provide delicious side dishes with their sweet taste, which is great for your Fall table at harvest festival time or Halloween. Or even just on the family dinner table any night of the week.
Low in carbs and saturated fats, turnips are a good healthy choice of vegetable, providing important minerals such as potassium and calcium. They are also a good source of dietary fibre.
Root vegetables such as turnips are a great addition to any garden because they provide deep, rich soil for other vegetables and plants.
Turnips are best grown from seed around May. They will then be ready for harvesting in the Fall.
10 easy steps to grow turnips from seed
Follow our easy steps on how to grow turnip from seed and within a few months, you’ll be harvesting your own turnips!
Step One: Select a Container
Turnip seeds need to grow in containers with holes at the bottom for drainage. A good container would be a pot, or an old milk carton. Clay pots are also great. I tend to save small pots from previous years when I buy baby plants from my garden center.
The small plastic pots should be washed out and dried thoroughly and stored in a sealed plastic bag until you want to use them. Washing the pots before using again will ensure no pests or diseases are transferred from one plant to another. Planting seeds, such as turnip seeds, work really well in these containers.
Step Two : Choosing your soil
Turnips grow best in soil that has been mixed with compost or manure. A good option would be to buy a bag of potting soil specifically for growing vegetables from your local garden center, or you might just have some in storage. Make sure to mix it up well before adding it to the container so that there aren’t any dry areas.
Step Three: Planting your Turnips
Fill the container with potting soil, leaving about 1.5 cm room at the top of the pot or container.
Plant the small turnip seeds at a depth about 1.5 cm from the top edge of the post (not too deep, not too shallow). Cover with a thin layer of dirt and water well to help encourage root growth. Do not be tempted to scatter too many seeds into one pot. They are tiny but they will grow. Plant a maximum of 4-5 per pot.
Step Four: Adding Water and Fertilizer
Add water to the pot or container on a daily basis, making sure that there is enough moisture in the soil so that it’s not too dry but also avoids letting your turnips become soggy.
Step Five: Positioning
Turnips like the sun. They may not be as sun craving as tomatoes but do try to give them the best start by placing the pots or containers on a sunny window sill inside, in your greenhouse or in your sunroom.
A greenhouse will give them the best of both worlds as they get heat and plenty of light.
Step Six: Thinning out and planting outside
Turnips are ready to be thinned out when they have grown in size and shoots are about 3 cm tall. This usually happens after about one months or so, but you’ll know because your turnips will start getting overcrowded and some leaves will show signs of yellowing due to a lack of light. So don’t let them get to big whilst still in their pots or containers.
Step Seven: Planting out
Gently turn the pot upside down in the palm of your hand. The plant should fall out quite easily from the container into your hand. Place the clump of shoots gently on your planting table. With care, separate out the delicate stalks being sure to keep their roots in tact.
Step Eight: Replanting
Replant each seedling into your garden or into larger vegetable planters. Turnips like a lot of space. Space each little plant out, about 30 to 40 cm apart. Try to find the best place in your garden where it will get plenty of sun and not be too crowded by other plants or vegetables at harvest time.
Step Nine: Watering and feeding
Water and feed your turnips with some liquid organic fertiliser such as seaweed extract or fish emulsion. If you don’t want the extra work of applying this then just water them well when you plant them, and regularly thereafter so the soil does not dry out. This helps the plant establish roots and get used to their new home more quickly.
Step Ten: Harvest time!
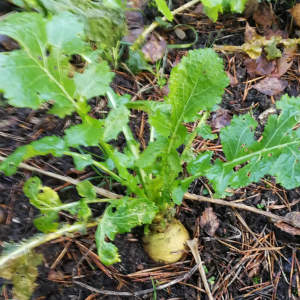
After about three to four months, in the Fall, you will see that a leaf has turned yellow on top of the plant. This signals it has reached maturity and you can carefully dig up your turnip. You should see a white root that is slightly firm to the touch.
Keep cool for a long life
When you dig up your turnips, wash them carefully, remove the top green stalks and put them in the crisper section of your refrigerator. They will happily keep for a few months.
If you don’t have room in your fridge, turnips like to be stored in a cool place so if you used an unheated garage to store them, be sure that the temperature stays between 10 to 15 degrees Celsius (50 – 60 degrees Fahrenheit).
Plant in Spring ready for Fall
Have you been looking for some inspiration on which new veggies to grow your own food? If so, then planting turnips from seed could be the perfect solution. Turnips seeds are inexpensive, easy to plant and take up relatively little space in your garden or backyard.
Plus they taste great when harvested fresh!
You can start now in the Spring and have fresh home-grown turnips by the Fall if you get started today. And don’t worry about how much sun is needed – these plants will thrive just fine with 6 hours of sunlight each day. So what are you waiting for? Grab some seeds and let’s get growing!
